In this fourth article of the #Kubernetes #homelab series, we delve into the process of setting up a local DNS for both my home network and homelab cluster using a combination of Pi-Hole, Unbound, DuckDNS, CoreDNS, and Cloudflare. I will share how I implemented several important DNS-related capabilities including:
- Enablement of an internal domain used for cluster #ingress and load balancing
- Accessibility of home network services via the Cloudflare VPN WARP client
- Enablement of Dynamic DNS via DuckDNS
- Enablement of DNS-based ad-blocking, improving home network privacy and security
- Enablement of DNS-caching, improving home network performance
- Enablement of an easy-to-use web-based UI for DNS management
Looking back to the homelab project roadmap as are getting close to wrapping up our preliminary work, as this is the second to last topic before we begin setting up the actual homelab cluster:
timeline

Preliminary work
: Setup management node
: Setup a private certificate authority (CA)
: Setup multiarch container build process
: Setup local DNS
: Setup hosts

Cluster Bootstrap
: Setup Ceph on storage nodes
: Setup Microk8s
: Setup cluster GitOps pipeline - Flux, SealedSecrets, and a node debug shell
: Setup Ceph CSI Driver (ARM64)

Service CI/CD Enablement
: Setup Docker Registry
: Setup ClusterSecret
: Setup cert-manager and cert-manager-trust
: Setup Gitea and Jenkins

Observability Enablement
: Setup Prometheus
: Setup Promtail and Loki
: Setup k8s-event-logger
: Setup Grafana

Core Service Enablement
: Setup MetalLB
: Setup Nginx Ingress
: Setup Cloudflare tunnel and VPN client
: Setup OpenLDAP
As with the other articles in this series, I will share what I did and present it in a how-to style so other folks looking to create a similar setup can (hopefully) benefit, let’s get started!
Architecture & Design
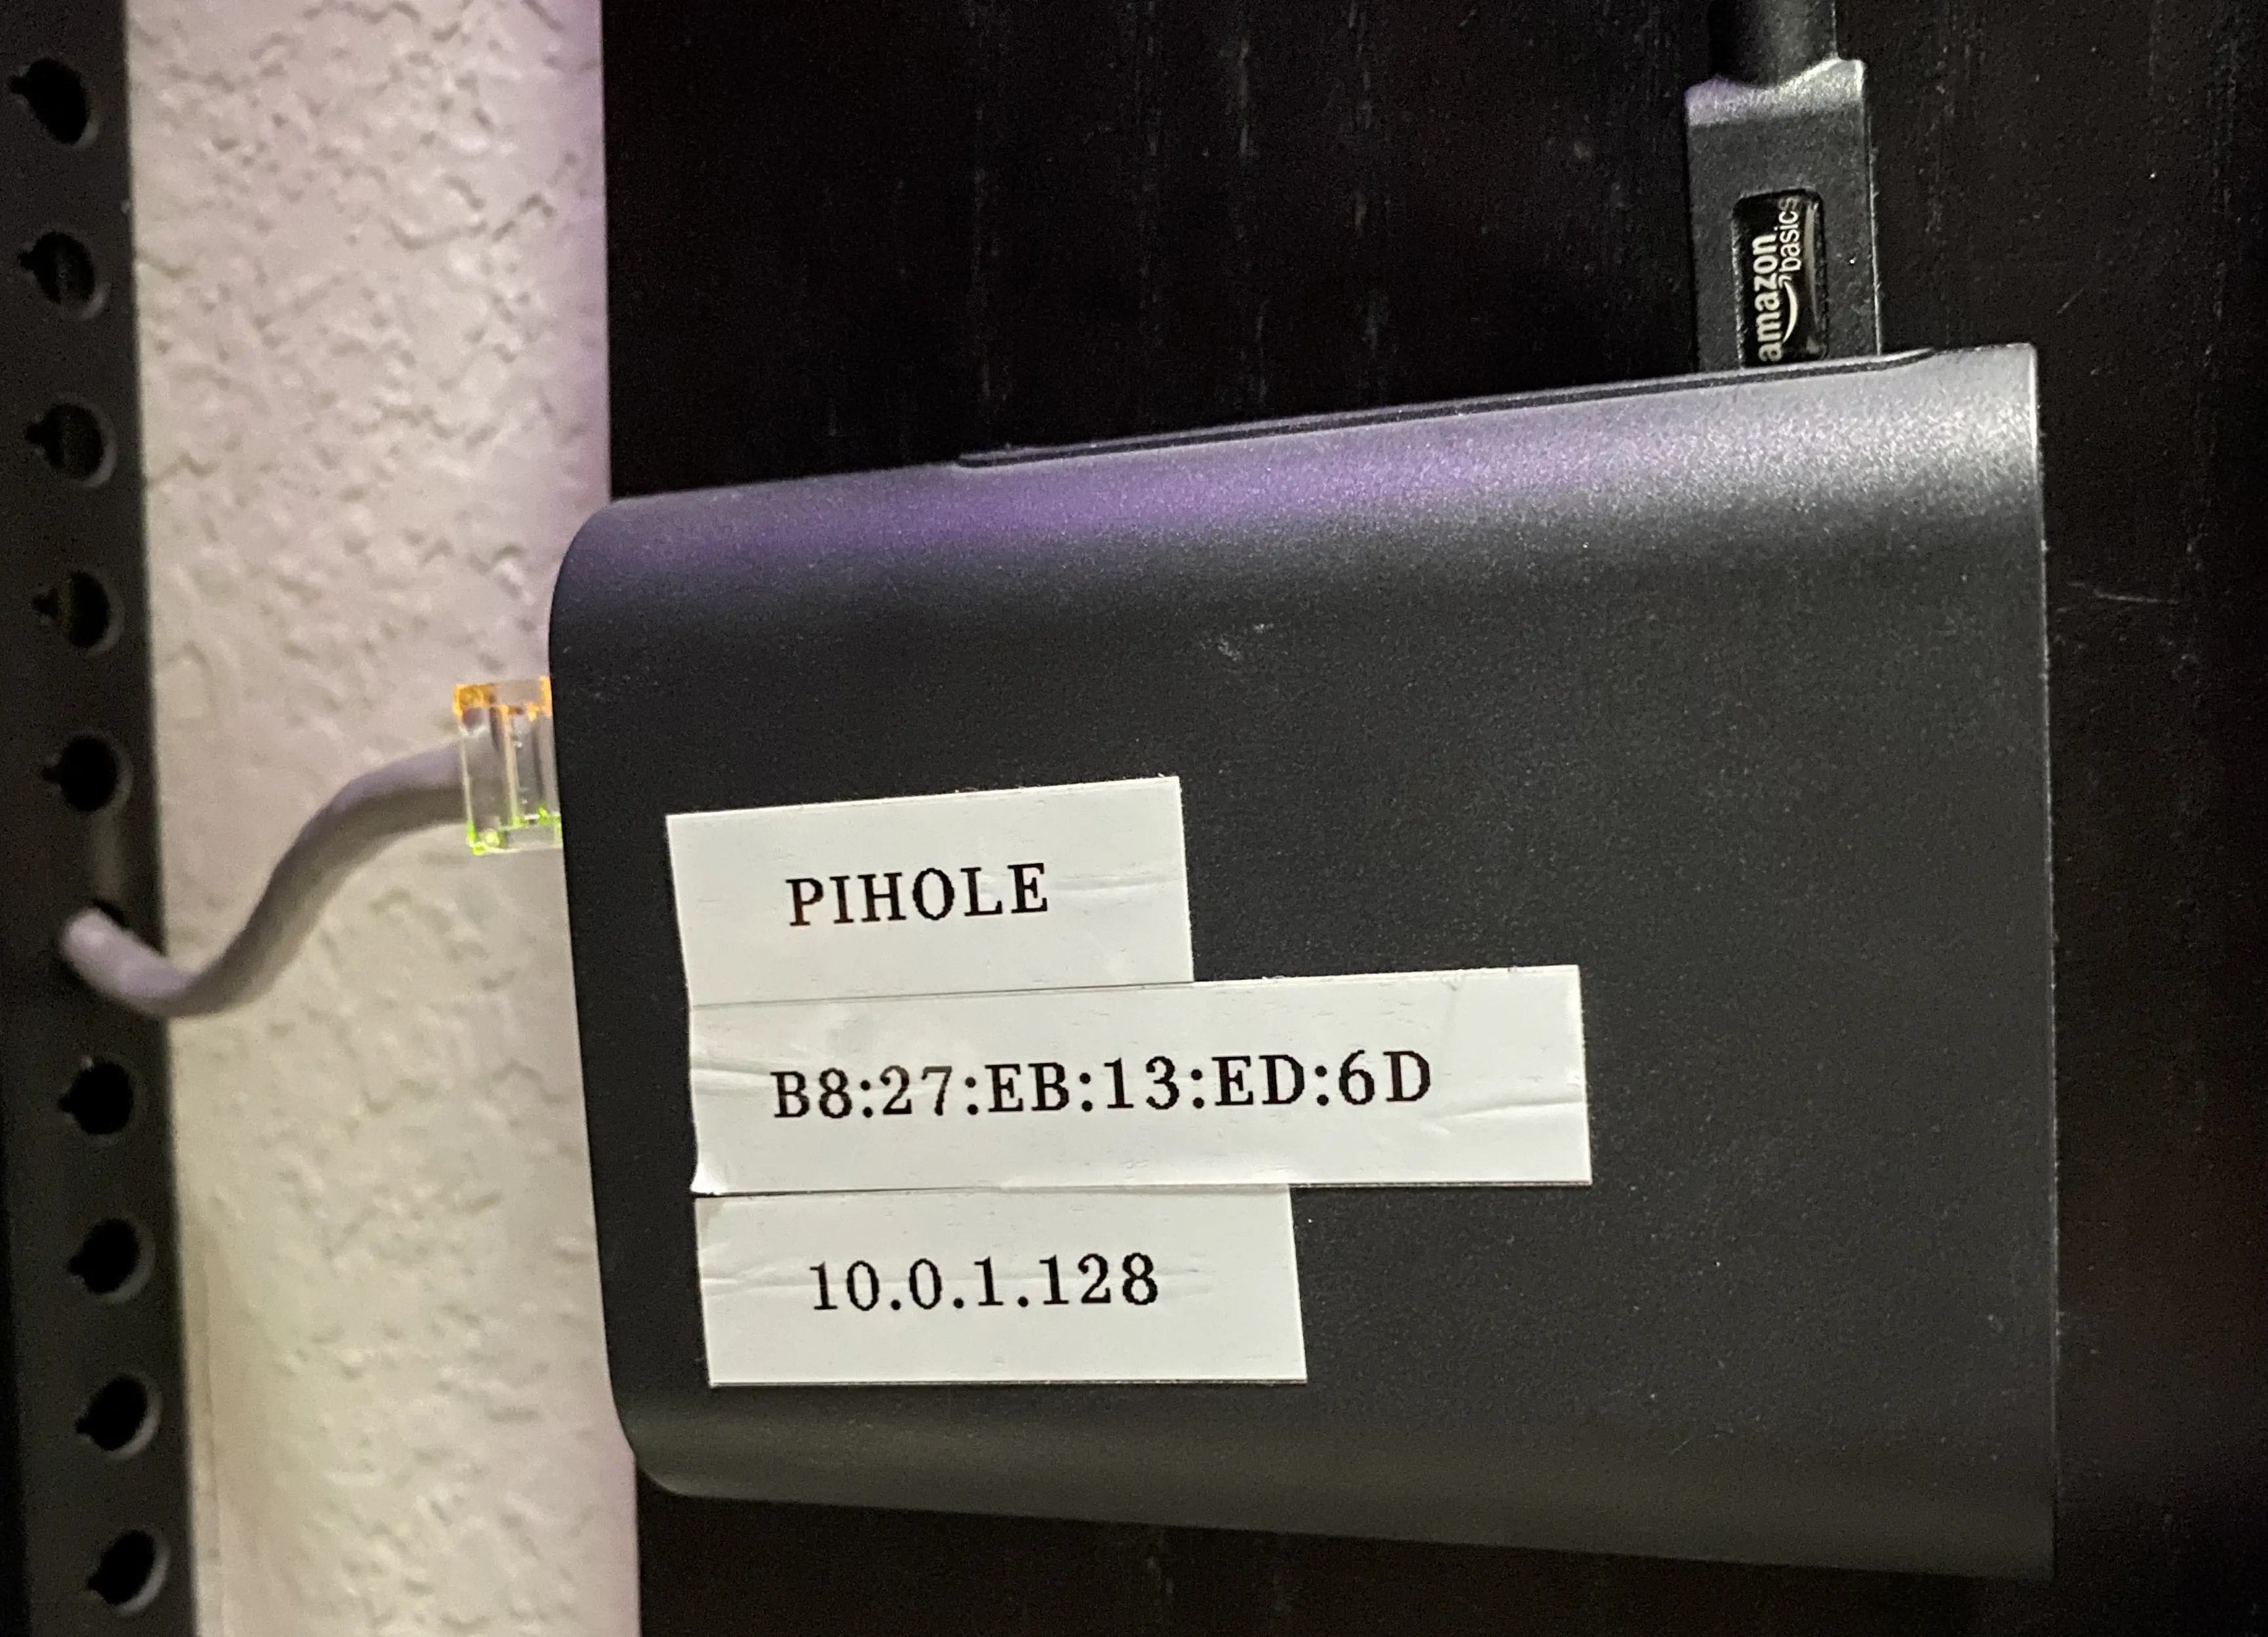
Architecturally, my local DNS setup is centered around Pi-Hole. Pi-Hole will receive DNS queries from Kubernetes-managed containers, internal clients (such as my workstation), and VPN clients via Cloudflare. Then, if the DNS query is in a domain that is locally managed by Pi-Hole it will respond with the corresponding IP address. For domains not managed by Pi-Hole it will forward the request to Unbound, which will perform recursive name resolution and cache the response. As mentioned in the introduction, I also have a use case where external clients need to resolve a DNS name to the current external IP address of my home Internet, which I accomplish via DuckDNS, a free dynamic DNS provider. The entire local DNS system is deployed on a humble RaspberryPi 2, which is more than adequate.
The logical model below shows how each component in my local DNS architecture is connected:
flowchart TB

EXT_CLIENTS("fas:fa-users External Clients")
DUCKDNS("<SaaS>\nfas:fa-cloud DuckDNS")
DUCKDNS_DNS_DB[(External DNS)]
DUCKDNS -.- DUCKDNS_DNS_DB
EXT_CLIENTS -- Resolve name to public IP --> DUCKDNS
CLOUDFLARE("<Tunnel>\nfab:fa-cloudflare Cloudflare")

subgraph Home Network

subgraph Pi-Hole Host
PIHOLE_SVC(["fas:fa-cog Pi-Hole Daemon"])
LOCAL_DNS_DB[(Local DNS)]
DNS_CACHE[(Cache)]
UNBOUND_SVC(["fas:fa-cog Unbound Daemon"])
DUCKKDNS_SVC(["fas:fa-cog DuckDNS Cron"])

PIHOLE_SVC -- Forward --> UNBOUND_SVC
PIHOLE_SVC -.- LOCAL_DNS_DB
PIHOLE_SVC -.- DNS_CACHE
end

subgraph Kubernetes Homelab
COREDNS(["fas:fa-cog CoreDNS"])
CLUSTER_DNS_DB[(Cluster DNS)]
POD_CLIENTS("fas:fa-users Pod Clients")

POD_CLIENTS -- Resolve --> COREDNS
COREDNS -.- CLUSTER_DNS_DB
end

COREDNS -- Forward --> PIHOLE_SVC

ROUTER("fas:fa-server Router")
INT_CLIENTS("fas:fa-users Internal Clients")
INT_CLIENTS -- Resolve --> PIHOLE_SVC
ROUTER -- Assign DNS servers --> INT_CLIENTS

end

AUTH_NAMESERVERS("<DNS>\nfas:fa-server Public Authoritative Nameservers")
AUTH_DNS_DB[(Public DNS)]
AUTH_NAMESERVERS -.- AUTH_DNS_DB
UNBOUND_SVC -- Recursive resolve --> AUTH_NAMESERVERS

DUCKKDNS_SVC -- Refresh public IP --> DUCKDNS

CLOUDFLARE -- Resolve internal hosts --> PIHOLE_SVC
As shown in the logical model, the implementation consists of several clients, DNS services, and supporting components. If you plan on building a similar setup, I strongly recommend creating your own logical model first since this is a fairly complicated setup. Moreover, it is good to have a reference to look at when something doesn’t work 18 months later and you can’t exactly hot the system works.
DNS clients:
| Client | Description |
|---|---|
| Internal Clients | Clients on my internal network: personal computers, phones, Nest thermostats, doorbell, etc. all use Pi-Hole for name resolution |
| External Clients | External clients resolving the name attached to my public IP address will leverage DuckDNS |
| Pod Clients | Containers running inside of the Kubernetes homelab use CoreDNS for name resolution |
DNS services:
| DNS Service | Description |
|---|---|
| Pi-Hole | Pi-Hole is an open source DNS service that is the central component to the entire configuration. Pi-Hole can resolve local DNS names, block advertisements, and provides a UI for managing local DNS |
| CoreDNS | CoreDNS maintains DNS records relevant to internal cluster resources such as Kubernetes services. CoreDNS is configured to forward all non-cluster DNS queries to Pi-Hole |
| DuckDNS | DuckDNS is a free dynamic DNS service that maintains a DNS name with the current public IP address assigned by my ISP |
| Public Authoritative Nameservers | External public authoritative nameservers maintained by each domain owner (vs the caching nameservers provided by my ISP) |
Supporting components:
| Component | Description |
|---|---|
| Router | The home network router is responsible for assigning DNS servers to clients via DHCP |
| Unbound | Unbound is a recursive DNS resolver that contacts the appropriate public authoritative nameservers when it received requests for non-local names by Pi-Hole |
| DuckDNS Cron | A cron job that updates DuckDNS with the dynamic IP assigned by my ISP |
| Cloudflare | Cloudflare is configured to forward a list of pre-configured internal domains to Pi-Hole when they are connected to via their WARP VPN client. Additionally, Cloudflare is configured to use Pi-Hole to resolve the internal hostname of the service hosting www.theobjectivedad.com |
Home Network Configuration
The first part of this article will cover the configuration of DNS services related to my internal home network. This includes Pi-Hole itself, Unbound, my router, and the homelab Kubernetes cluster.
Pi-Hole
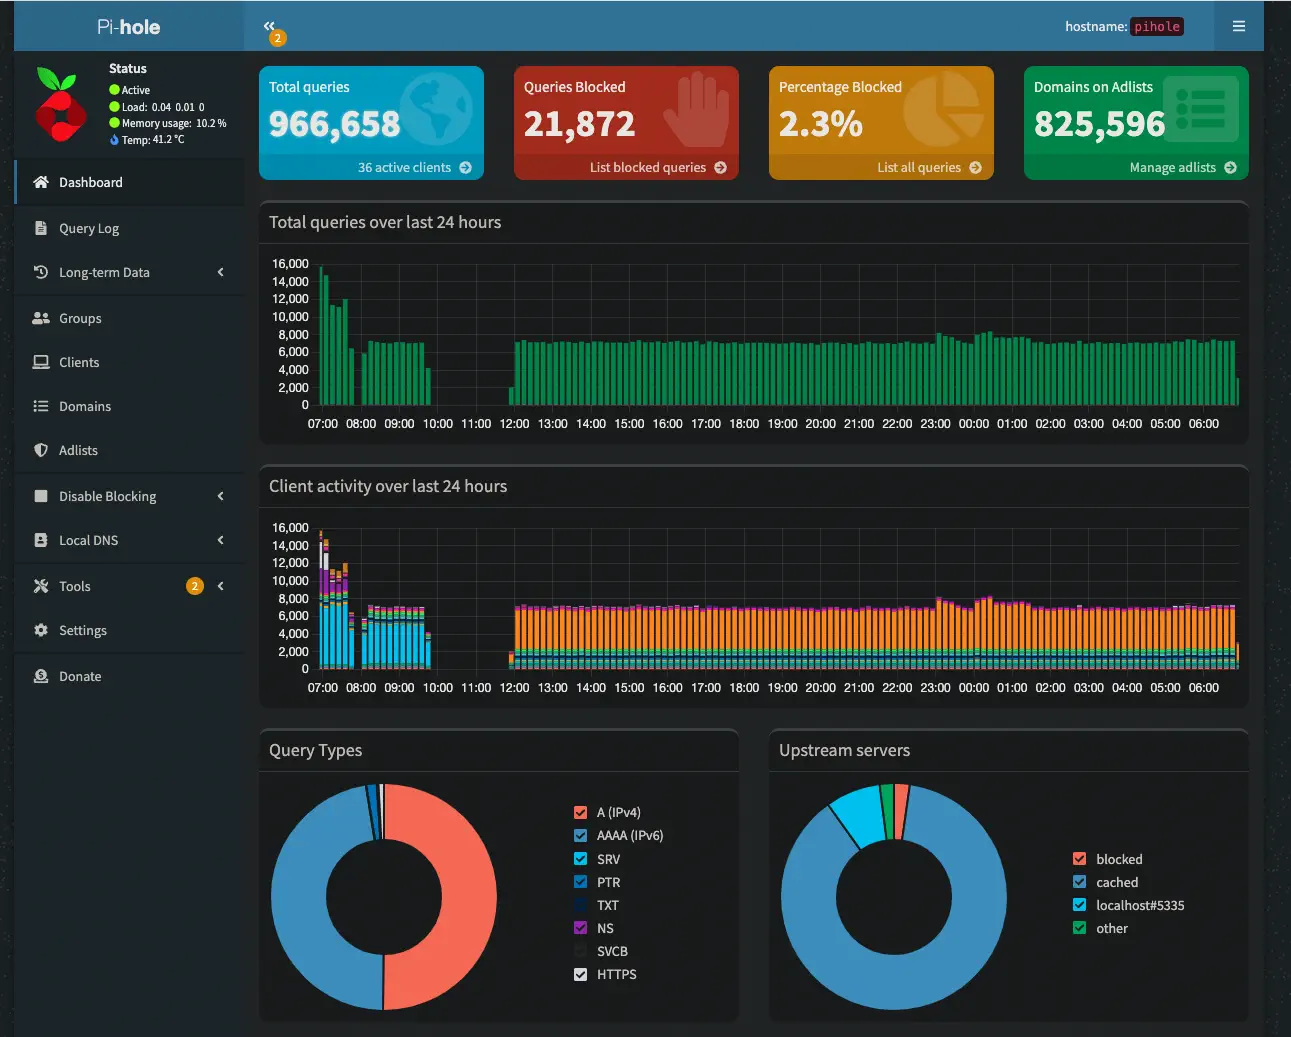
When browsing the Pi-Hole website you will see that it is primarily advertised as an ad-blocking tool. Pi-Hole is actually a DNS server that blocks ads by maintaining a list of domains that it will refuse to resolve. It does this quite well and I do use the ad-blocking capability heavily and with great success on my home network. On an average day, the device responds to around 1 million queries per day with plenty of room to grow:
Unbound
Unbound is an optional recursive DNS server that can receive forwarded requests from Pi-Hole. The main advantage of using Unbound to resolve DNS names using root nameservers and authoritative nameservers is that I am no longer reliant on my Internet provider’s DNS. Not only does this allow me to better control caching and reduce traffice over my home Internet, it also offers better privacy. The Pi-Hole documentation contains an excellent tutorial on how to setup unbound however the setup is easy enough to also include here.
First, install Unbound on the system running Pi-Hole:
sudo apt install unbound
Next, download a fresh copy of root.hints:
curl -s https://www.internic.net/domain/named.root -o /var/lib/unbound/root.hints
Since root nameservers can change, it is a good idea to keep root.hints up to date. I added the following crontab entry to download a fresh copy automatically every 3 months via the crontab -e command:
0 2 1 3,6,9,12 * /usr/bin/curl -s https://www.internic.net/domain/named.root -o /var/lib/unbound/root.hints
Next, we need to configure /etc/unbound/unbound.conf.d/pi-hole.conf, this is my configuration:
server:
    # If no logfile is specified, syslog is used
    logfile: "/var/log/unbound/unbound.log"
    verbosity: 1

    interface: 127.0.0.1
    port: 5335
    do-ip4: yes
    do-udp: yes
    do-tcp: yes

    # May be set to yes if you have IPv6 connectivity
    do-ip6: no

    # You want to leave this to no unless you have *native* IPv6. With 6to4 and
    # Terredo tunnels your web browser should favor IPv4 for the same reasons
    prefer-ip6: no

    # Use this only when you downloaded the list of primary root servers!
    # If you use the default dns-root-data package, unbound will find it automatically
    root-hints: "/var/lib/unbound/root.hints"

    # Trust glue only if it is within the server's authority
    harden-glue: yes

    # Require DNSSEC data for trust-anchored zones, if such data is absent, the zone becomes BOGUS
    harden-dnssec-stripped: yes

    # Don't use Capitalization randomization as it known to cause DNSSEC issues sometimes
    # see https://discourse.pi-hole.net/t/unbound-stubby-or-dnscrypt-proxy/9378 for further details
    use-caps-for-id: no

    # Reduce EDNS reassembly buffer size.
    # Suggested by the unbound man page to reduce fragmentation reassembly problems
    edns-buffer-size: 1472

    # Perform prefetching of close to expired message cache entries
    # This only applies to domains that have been frequently queried
    prefetch: yes

    # One thread should be sufficient, can be increased on beefy machines. In reality for most users running on small networks or on a single machine, it should be unnecessary to seek performance enhancement by increasing num-threads above 1.
    num-threads: 1

    # Ensure kernel buffer is large enough to not lose messages in traffic spikes
    so-rcvbuf: 1m

    # Ensure privacy of local IP ranges
    private-address: 192.168.0.0/16
    private-address: 169.254.0.0/16
    private-address: 172.16.0.0/12
    private-address: 10.0.0.0/8
    private-address: fd00::/8
    private-address: fe80::/10
Now, restart Unbound:
sudo service unbound restart
The final step is to point Pi-Hole to Unbound via the Pi-Hole user interface. This is done on the settings page by adding 127.0.0.1#5335 as a custom upstream DNS server:
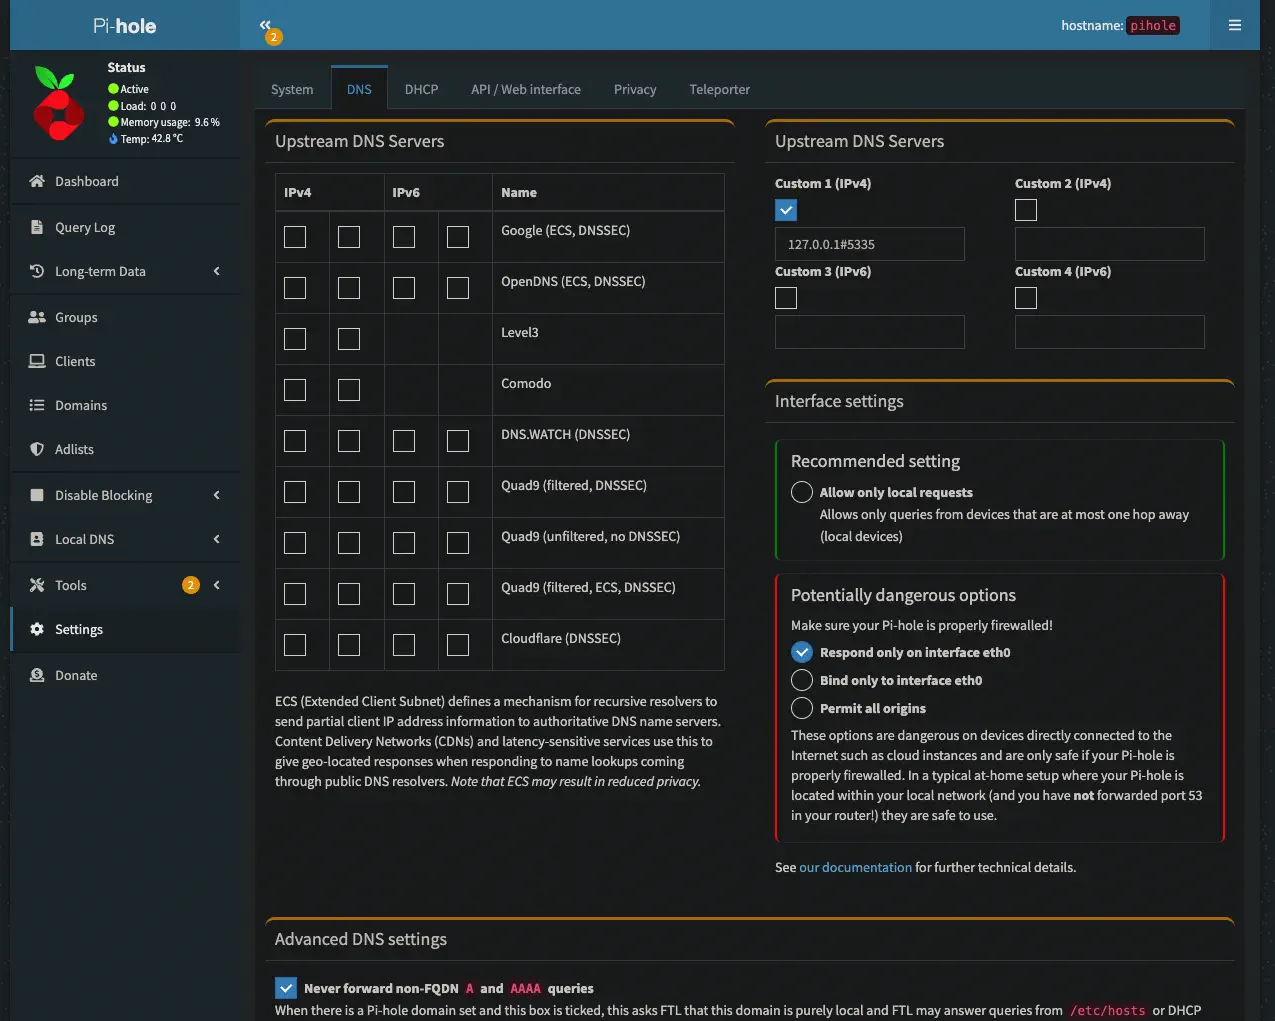
At this point, Pi-Hole is fully configured to use Unbound as a recursive DNS resolver.
Router
Setting up Pi-Hole to block advertisements usually involves configuring the router to send the Pi-Hole DNS server address back to DHCP clients when they join the network. Clients will then happily send all DNS traffic to Pi-Hole instead of my ISP’s DNS servers. Every router configuration will be different, however, most routers I’ve seen will have a DNS override setting somewhere near the DHCP configuration. On my ROG GT-AX11000 it is located in the screenshot below:
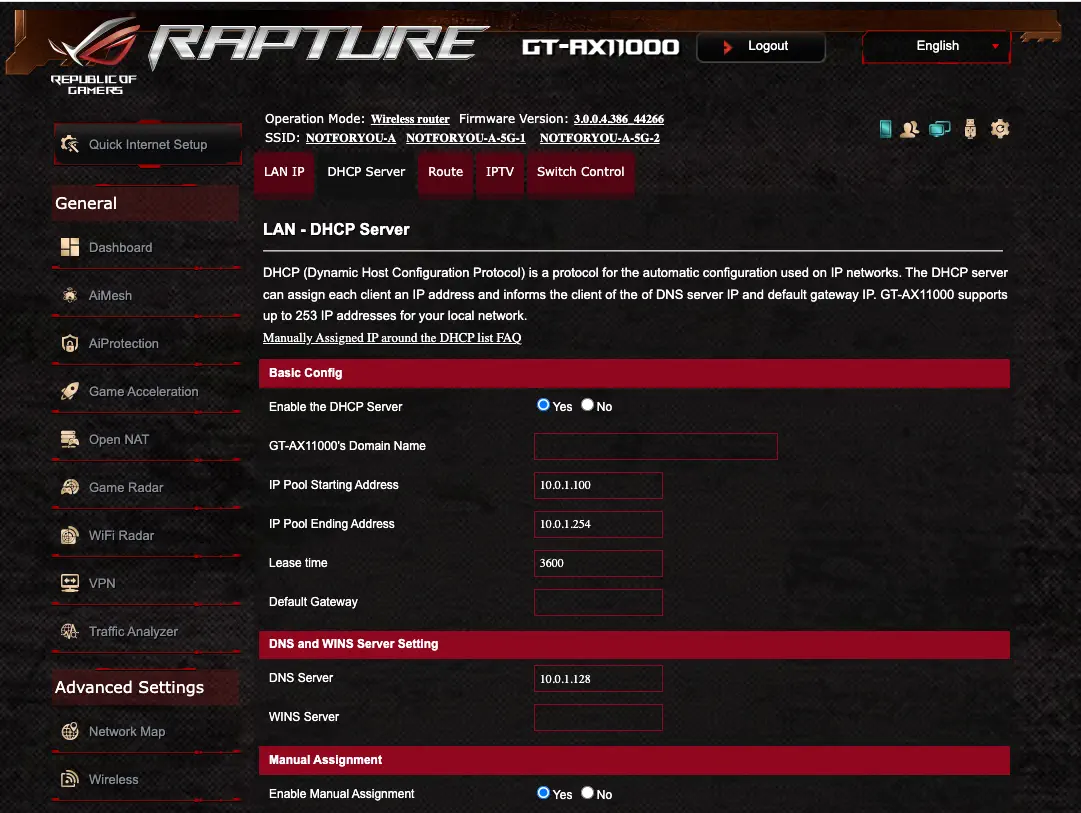
Once the change is made you will need to forcibly refresh DHCP client leases or just wait for leases to expire. Now every client on my home network will leverage the local Pi-Hole DNS device for name resolution.
Kubernetes Cluster Configuration
I realize that I’m getting ahead of myself a little since the DNS configuration is technically preliminary work, however for completeness, I do want to mention how I am using this the local DNS setup with my homelab Kubernetes cluster.
CoreDNS
As with most #Kubernetes clusters, microk8s provides an easy way to enable CoreDNS in the cluster. CoreDNS a CNCF graduated project and is used for in-cluster name resolution. By configuring CoreDNS to leverage the Pi-Hole device, I am able to refer to all homelab cluster nodes nodes by name as well as take advantage of name-based routing of HTTP traffic through the cluster ingress controller.
To configure CoreDNS to use the Pi-Hole device, simply modify the CoreDNS ConfigMap entry to forward requests:
.:53 {
  forward . 10.0.1.128
}
At this point, CoreDNS will be used internally by the cluster for all cluster-local name resolution requests and then forward everything else to the Pi-Hole device.
Local DNS Setup
At this point, everything on the home network is using the Pi-Hole device for name resolution and we are now ready to configure a local domain. For better or worse I decided on kube as my local homelab domain name. As shown in the screenshots below, I am using a node naming convention of kube[0-9]{2}. Additionally, there is an A record pointing at 10.0.1.40 which is an IP used by MetalLB running in the cluster itself:
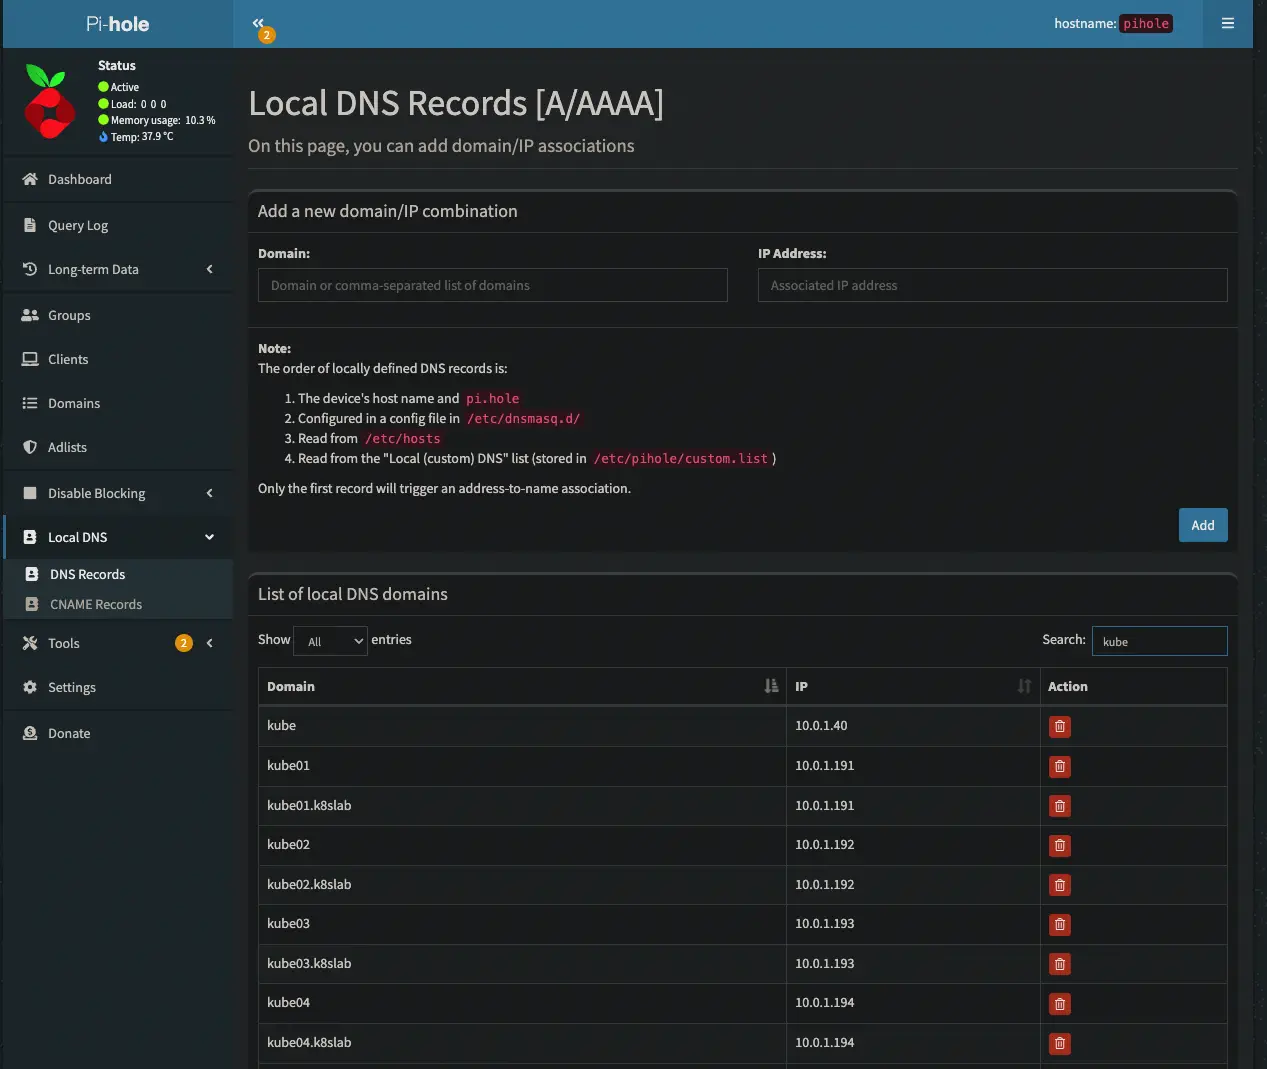
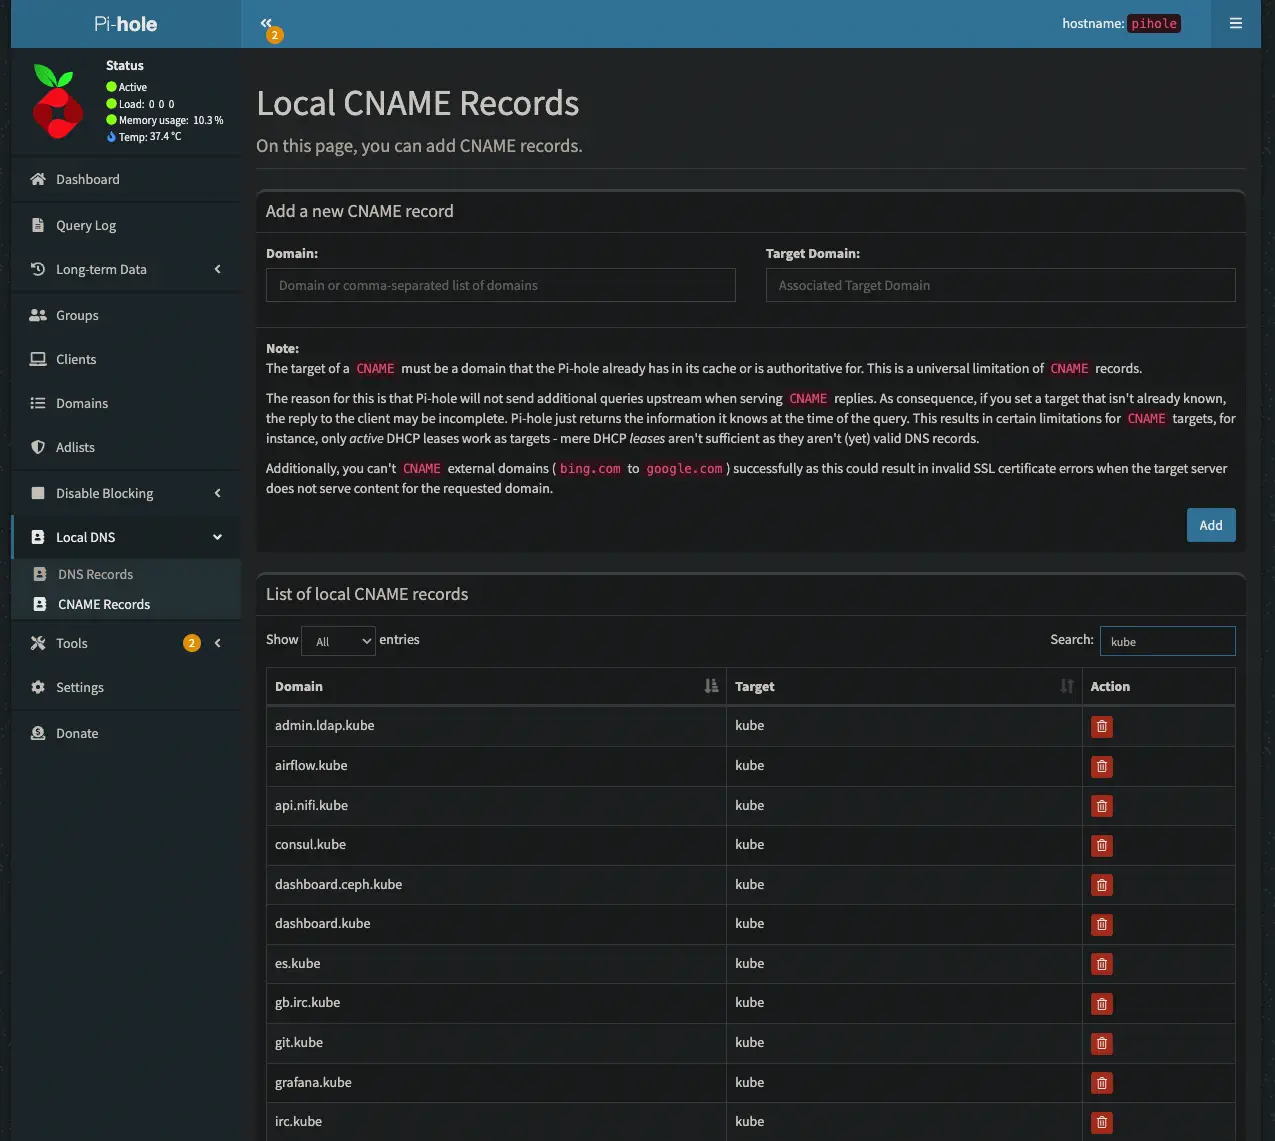
The homelab cluster ingress controller has a load balancer service configured to use the 10.0.1.40 IP address. Since the vast majority of services use name-based routing, this is an efficient way to expose cluster services to the rest of my internal home network. From a DNS standpoint, all services are configured as CNAME records pointing to the kube A record previously shown:
External Configuration
The final section documents how I configured external DuckDNS and Cloudflare services to use the Pi-Hole device.
DuckDNS
Like most folks building a homelab inside of residential broadband, my external IP address provided by my ISP changes periodically. This poses a problem when I need to access my homelab while I’m away. The majority of the time it is better to use other services such as Cloudflare’s amazing private network service however if all else fails it is often useful to have a way back into my home network while I’m away from home.
The DuckDNS service is a free dynamic DNS service that maintains a DNS name with the current public IP address assigned by my ISP. This is accomplished periodically by running a cron job that sends my current public IP over to DuckDNS. For details see the DuckDNS installation page.
Cloudflare
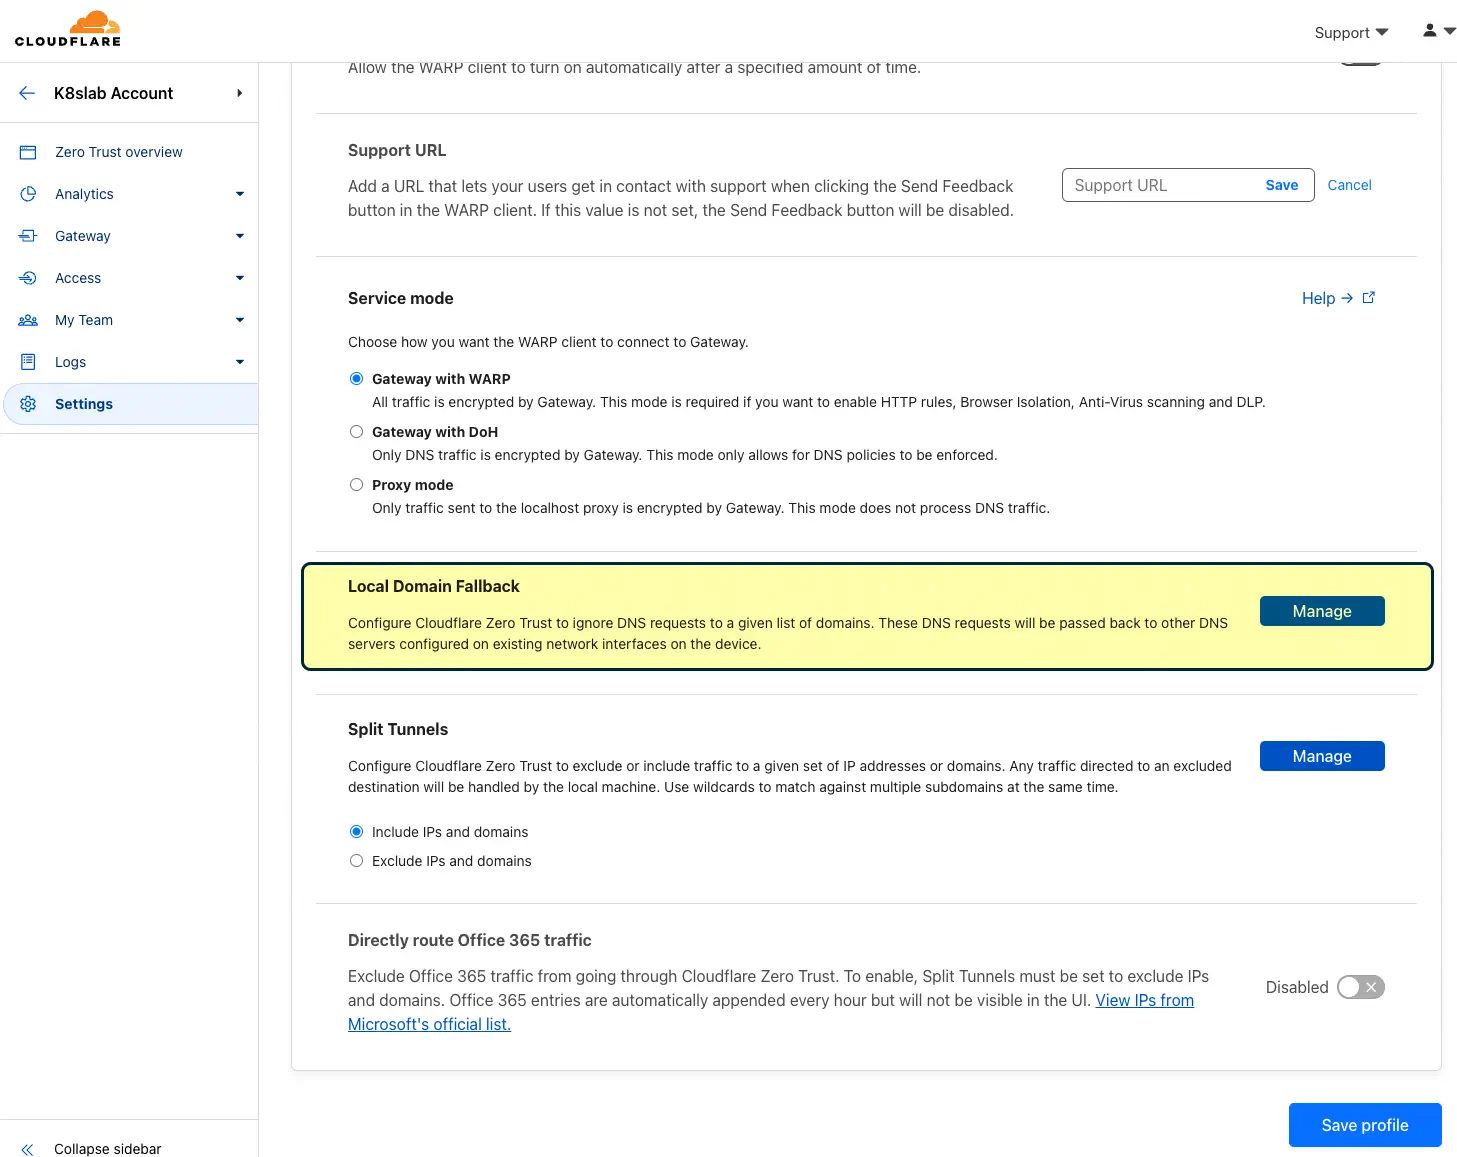
Assuming you already have a Cloudflare tunnel configured and working, there are only a few additional steps that need to be performed to take advantage of the Pi-Hole DNS device. First, log into the Cloudflare Zero Trust Console. Next, navigate to settings, WARP Client, and then choose to configure the desired device profile. Once you are on the device profile configuration screen, scroll down to “Local Domain Fallback”:
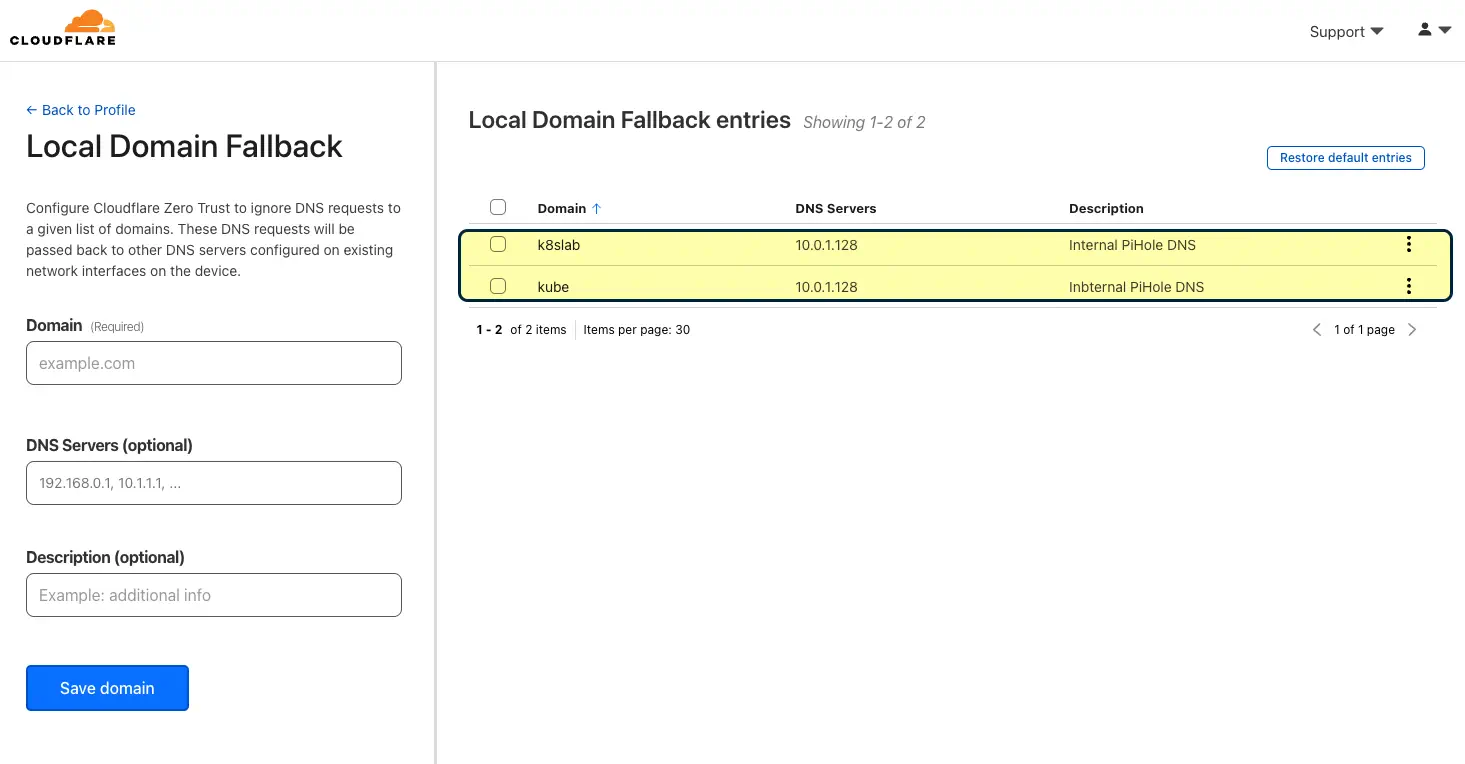
Now you can add private local domains and a list of DNS servers that the WARP client can use to resolve:
Finally, before WARP clients connecting over at the Cloudflare VPN tunnel can access internal DNS, there needs to be a firewall rule added:
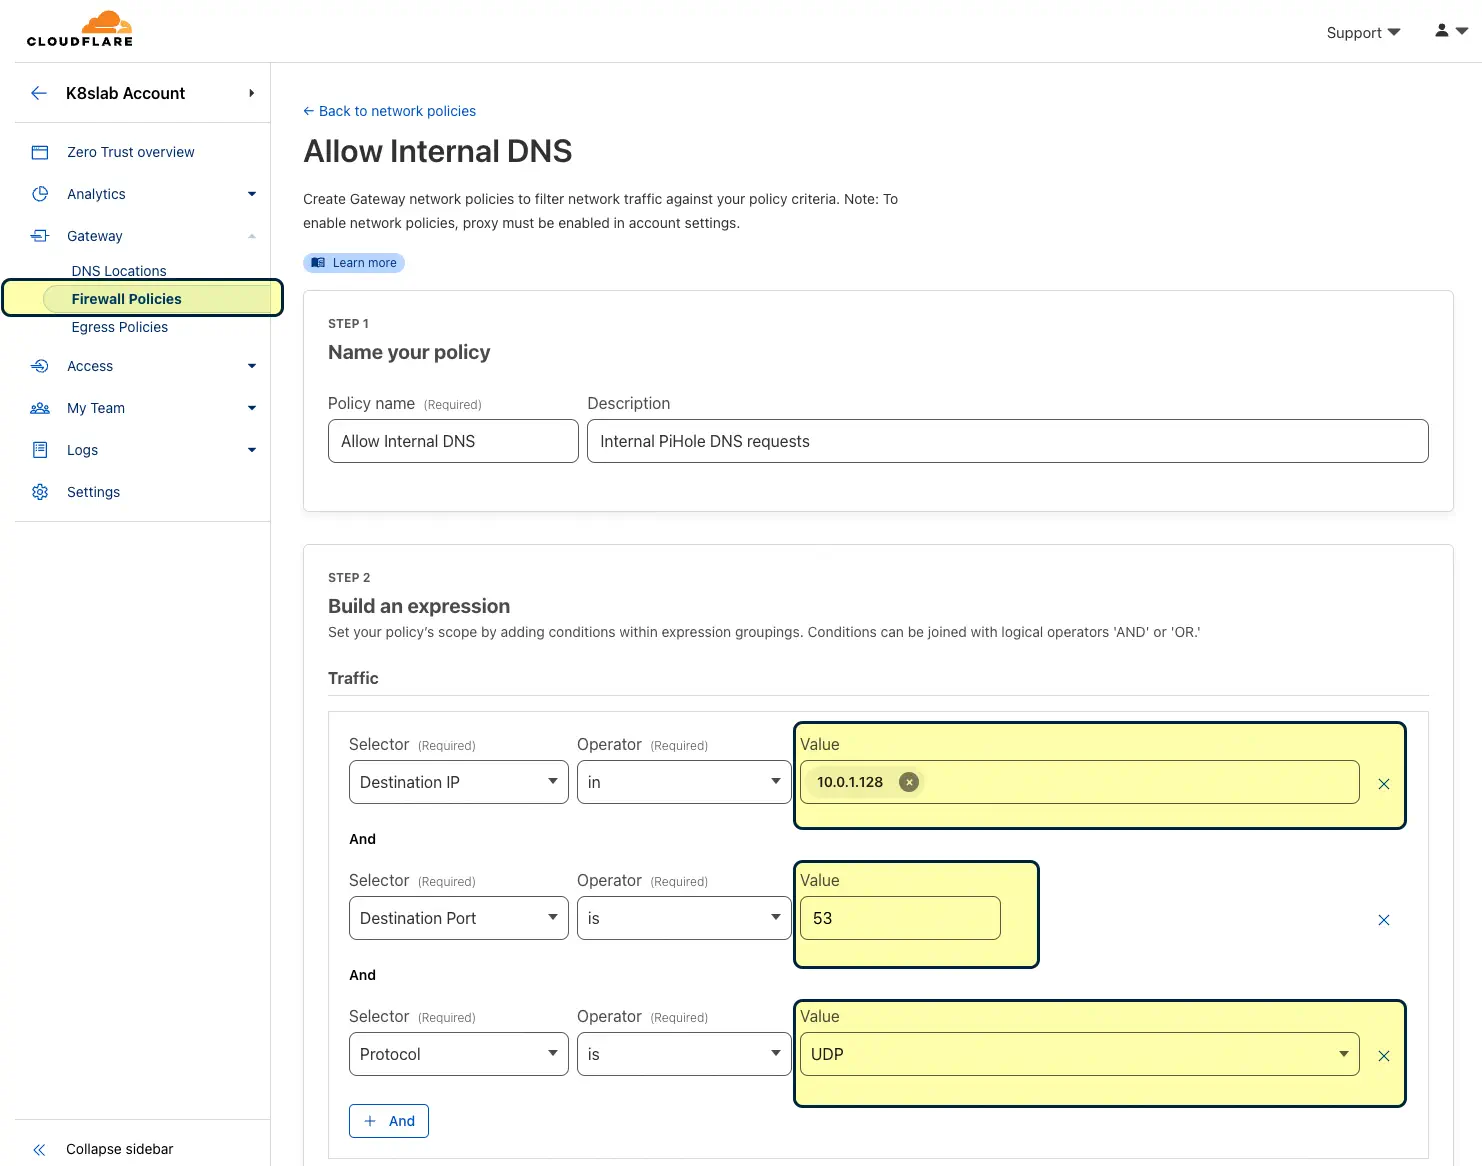
At this point, WARP clients should be able to resolve private/local names from the Pi-Hole DNS service.
Final Thoughts
This article was a fairly comprehensive view of local DNS from a configuration standpoint however I haven’t yet touched on the ever-important operational components including:
- Automated backups
- Restore procedure
- Disk space management & purging
- Log management
- Automated Pi-Hole device updates including OS, FTL, and Pi-Hole software
- Plans for another Pi-Hole device to increase reliability
Since the Pi-Hole DNS device is a foundational component to the homelab cluster, website, and frankly my family’s personal Internet, I cannot stress enough how important it is to have a good handle on these operational procedures. As mentioned on the fourth bullet point I’m planning to add a secondary device to increase redundancy. A final note about reliability, I did pick up a consumer-grade IP power switch that has the capability of detecting some problems with the Pi-Hole device and automatically performing a power-cycle. If there is interest I’d be happy to share these topics in detail in a future article.
Up next in the series we will wrap up our preliminary work by setting up the actual #RaspberryPi nodes. As always, thank you for taking the time to read this article, I hope you found it helpful.