In late December 2022, I made a significant upgrade to my deep-learning workstation. Prior to the upgrade, I had been using a custom-built workstation with 2x Nvidia GeForce GTX 1070 Ti GPUs for my deep learning experiments. While this setup was suitable for entry-level deep learning projects, it had its limitations. The 8GB VRAM on each GPU prevented me from tackling the more demanding projects I am planning. The following were the main criteria I was looking for:
- Good Hardware support: Given the significant investment I’m making, relying on ordering parts from around the Internet isn’t ideal. I prefer having a single point of contact in case any components fail.
- No electrical work required: Must run reliably on a standard 120v 15A circuit, bigger = better up to a point but it still needs to run in my home.
- Nvidia GPUs: I’d love to see more competition in the GPU market but at the moment Nvidia GPUs are all I care about for deep learning projects.
- Remote Control: Depending on the amount of heat produced and power consumption I want to have the option to move the workstation around the house without much hassle.
In the end, I decided to go with this Lambda Vector workstation: Needless to say, this was a major upgrade and significantly increased my capability to work with more advanced deep learning projects. The rest of this article will focus on how my future projects for the new workstation, setup, initial performance testing & observations, and finally a short review.
Planned Projects
To give a sense of what I have planned for the new workstation, I have 3 deep learning projects planned. All three are learning projects to improve and/or maintain my skill set.
- License plate detector: Records license plate numbers to a database detected from frames of video provided by \(n\) cameras. The training methodology is transfer learning with my dataset using publicly-available state-of-the-art base models. I plan to use the database in a future project to detect anomalous vehicles in my neighborhood.
- Speech to text converter: Converts spoken audio in English to text. The training methodology is transfer learning with my own dataset using publicly-available state-of-the-art base models. I have two use cases in mind for this. First I’d like to generate a new dataset for future projects by converting recordings from my HAM radio & scanner to text. Second, I would like to be able to ask questions verbally to ThetaBot a frontend to the OpenAI davinci-3 model that currently only can take text-based input from a private IRC network I’m running.
- Synthesized speech generator: Converts English text to spoken audio. I plan to use this in conjunction with the speech-to-text converter to converse verbally with ThetaBot.
Configuration
The first task to operationalize warmachine (my new workstation) was to implement a configuration that allows me to also use the GPUs in truck (my old workstation) as well as leverage cloud computing resources in the future if I ever outgrow my current setup. To this end, both warmachine and truck are nodes in a Kubernetes cluster:
flowchart TB

subgraph NODES[Cluster Nodes]
direction TB

LAMBDA("<Workstation>\nfas:fa-server warmachine")
GPU0("<RTX A6000>\nfas:fa-microchip GPU 0")
GPU1("<RTX A6000>\nfas:fa-microchip GPU 1")
GPU2("<RTX A6000>\nfas:fa-microchip GPU 2")
DATA0[("<14TB>\nData drive 0")]
DATA1[("<14TB>\nData drive 1")]

LAMBDA---GPU0
LAMBDA---GPU1
LAMBDA---GPU2
LAMBDA---DATA0
LAMBDA---DATA1

TRUCK("<Workstation>\nfas:fa-server truck")
GPU3("<GTX 1070Ti>\nfas:fa-microchip GPU 3")
GPU4("<GTX 1070Ti>\nfas:fa-microchip GPU 4")

TRUCK---GPU3
TRUCK---GPU4

end

subgraph Kubernetes
direction TB
ROOK(["fas:fa-cog Rook"])
TAO(["fas:fa-cog Nvidia Tao Toolkit"])
end


VSCODE("<Client>\nfas:fa-user VSCode")
VSCODE-- "<SSH, Docker>\nGlasseye via Remote Container" -->LAMBDA
AIRFLOW("<Client>\nfas:fa-user Apache Airflow")
Kubernetes---NODES
AIRFLOW-->Kubernetes
On the client side, I’m using VSCode since it has an excellent capability to develop inside a remote container. This allows me to access warmachine from any client machine connected to my home network that can run VSCode. The actual remote container runs a framework called Glasseye that I developed to provide several foundational capabilities including:
- A portable containerized environment for ML training & experimentation
- Dataset management & versioning
- Integration with MLflow for experiment, run, and model management
- Integration with Apache Airflow for orchestrating training piplelines
- Integration with the Tensorflow Object Detection API
- Integration with Nvidia Tao Toolkit
One of the most exciting things about warmachine GPUs with the Ampere architecture which is compatible with the Nvidia Tao Toolkit. The Tao Toolkit is a suite of tools and pre-trained models that simplify and accelerate the model-building process by reusing pre-trained models and adapting them for specific tasks. In my configuration, the Tao Toolkit is deployed in the cluster and responds to API calls initiated by Airflow or Glasseye.
For storage, Rook is responsible for managing Ceph which provides access to the 28TB attached to warmachine. Ceph is a good choice here since it is a single solution that provides block, shared filesystem, and S3+Swift compatible object storage options. This provides nearly 1:1 capabilities with AWS EBS, EFS, and S3 respectively if/when I ever need to move to a cloud service.
Performance Tests
Overall I observed outstanding results while testing with the excellent gpuburn tool. To compare the performance I was previously capable of with truck vs what I’m capable of now on warmachine, I ran 3 tests focusing on FP32, FP64, and tensor core performance. When considering all GPUs in the tensor core test warmachine was over 26x faster than truck with almost 172 trillion decimal calculations per second (17.2 TFLOPS/s):
| Date | Test | Warmachine (GFLOPS/s) | Truck (GFLOPS/s) |
|---|---|---|---|
| 2022-12-27 | 10min Tensorcore | 57,271 (each), 171,814 (3x) | N/A |
| 2022-12-27 | 10min FP32 | 13,685 (each), 41,055 (3x) | 6,517 (each), 13,034 (2x) |
| 2022-12-27 | 10min FP64 | 471 (each), 1,413 (3x) | 252 (each), 504 (2x) |
Testing Commands
The commands below were used to execute performance benchmarks:
FP32 test:
docker run --rm --gpus all --entrypoint=./gpu_burn gpu_burn 600
FP64 test:
docker run --rm --gpus all --entrypoint=./gpu_burn gpu_burn -d -tc 600
Tensor core test:
docker run --rm --gpus all --entrypoint=./gpu_burn gpu_burn -tc 600
Cooling Efficiency Tests
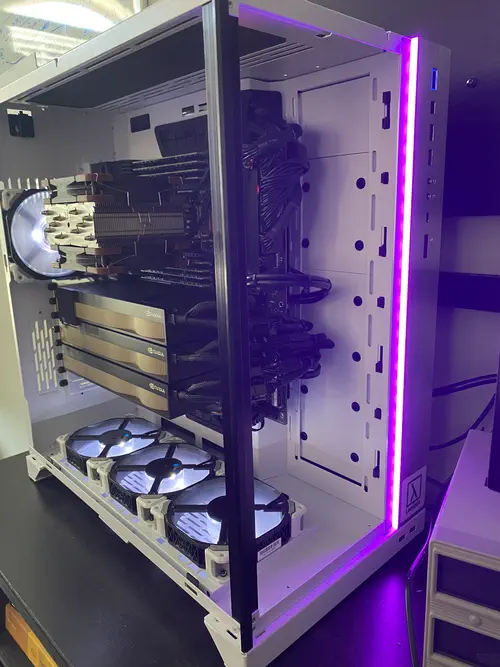
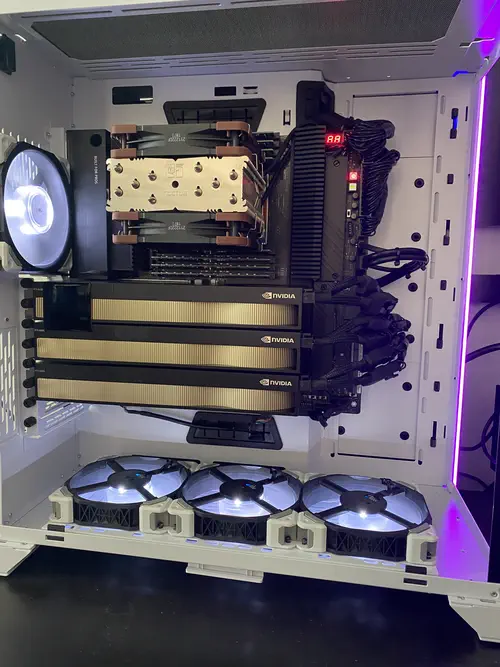
As visible in the photograph below, the cooling system is composed of three intake fans located at the bottom of the case, one exhaust fan at the rear, and two fans on each side of the CPU cooler.
I ran a quick unscientific test on the cooling system by executing the Tensorflow Object Detection API training pipeline on the faster_rcnn_resnet152_v1_640x640_coco17_tpu-8 base model using a relatively small dataset. To observe results I set up the Nvidia GPU Exporter](https://github.com/utkuozdemir/nvidia_gpu_exporter) for Prometheus and created a dashboard in Grafana to visualize.
The chart below shows that the default configuration of warmachine is susceptible to thermal throttling, a safety system that slows down the performance of a GPU to prevent overheating. Interestingly, the bottom GPU (466caa01-94c1-7753-b020-c589e620e44b) experienced almost no thermal slowdown, while the middle GPU (db87003f-a15a-c298-8f68-926fe542c2cd) had significantly more, and the top GPU (11a90166-d609-e9bb-3e91-1cfc999335fc) had even more.
This discrepancy is likely due to the design of the GPUs’ air cooling system. Because the GPUs are stacked so closely together, the air intake of one GPU sits too close to the exhaust of another, creating an airflow that blows increasingly warm air through the stack.
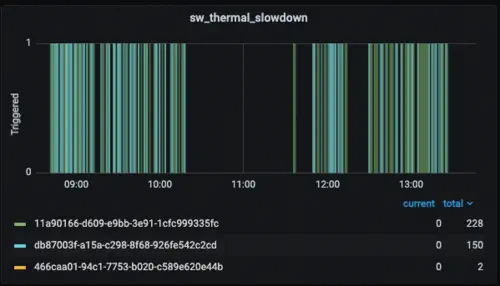
Based on the average clock speed % of all GPUs the overall efficiency was in the low 80s. I guess this is acceptable but admittedly slightly disappointing. I was able to mitigate this to an extent by running the other fans at maximum speed which gave me around a 4% performance boost.
Unfortunately, the motherboard chosen by LambdaLabs cannot control fan speed based on GPU temperatures in the PCIe slots, or by an external temperature sensor so I needed to adjust everything manually. In my opinion, this is a significant oversight. During compute-intensive training, the CPU may not be taxed enough to trigger an increase in fan speed. While the fan curves can be configured to some extent, I prefer not to run the fans at maximum speed when the CPU reaches a modest 60C. It may be possible to make API calls to the KVM to manually adjust fan speed before running a training job, but for a workstation at this tier, it should not be a problem.
Final Thoughts
Overall doing business with LambdaLabs was a great experience. Not only did they complete the build quickly but also communicated regularly and proactively. Emails were always answered quickly by the same folks I’ve been working with and the support portal was simple to use - I didn’t need to go through 40 screens asking me “did you try…” before submitting an actual ticket.
LambdaLabs ships with a bundle of pre-installed deep learning frameworks and tools called the LambdaStack. Since I was already up and running with Glasseye, my own framework, this wasn’t a major feature for me. In the end, I did grow to appreciate the fact that the numerous CUDA dependencies were all pre-installed and working from day 1. Anyone who has to set these up once every few years will know what I’m talking about. Notably missing from the LambdaStack was Docker and the Nvidia runtime which in my opinion should be part of the standard install.
On the negative side, one of the CPU fans shipped to me DOA. I checked the BIOS logs and saw 0 RPM alerts during the time Lambda was QA testing before shipping to me, which was annoying. The replacement process was easy enough though and once the right technician was assigned the replacement fan was quickly sent out.
Also, there were no additional hardware accessories shipped with the workstation. Typically I’d expect some spare screws to be included with a new high-end machine but the only thing that was included was (weirdly) a small WiFi dongle.
The documentation that comes with the workstation needs improvement. Although there is a small quickstart guide, it only contains basic information and leaves gaps that are relevant to a typical user. For instance, it should have included the default KVM password and mentioned that the display needs to be unplugged before desktop control can be initiated via the KVM. It would also have been helpful to include a parts manifest, as I was only able to inspect the workstation to inspect all the included hardware upon arrival. While I’m confident that the Lambda team would have provided one if I asked, it would have been more convenient to have this information easily accessible.
Overall, I have been thoroughly impressed with the performance as well as the fit and finish of the workstation, with only a few minor exceptions mentioned above. I am eagerly looking forward to using it for my upcoming deep-learning projects, and I am confident that it will be a valuable tool in the months and years to come. ![]()